Wednesday 30 January 2013

Dreaming of Some Sunshine

I have had so much fun over the last few days with the beautiful snow and rain we are having. I am always amazed at how a blanket of white can make everything so beautiful and the light seems to change. Plus, the moody sky of a proper rain storm is really very thrilling. However, with my sister back living in Australia and seeing photos of her all bronzed, I can not help dreaming of sun bathing and getting a tan (lets be fare we didn't really get a summer last year so I feel we are owed one).

When surfing the net I came across this great image....

Read the full article HERE

This article found over at kdhamptons.com gives you a tour of a family run bar in the Hampton's. I love the use of these vintage swim suits framed and placed on the wall. I wonder if you could adapt this to other vintage items - vintage lingerie in the bedroom! I wouldn't mind that white, red and black number for my summer holidays!
xx

Tuesday 29 January 2013

Tutorial: Cocktails - Champagne and Brandy

So, part of my goals for this year is to learn how to make cocktails. We are slowly collecting together a gathering of cocktail related items - an ice bucket, a soda bottom, a shaker..... However, I am still in the process of gathering the right ingredients. But this week has been a great week! It would seem we are having a stroke of luck running through our family at the moment and I felt a small celebration was in order. So a champagne cocktail is a must.

YOU WILL NEED:

  • Sugar cubes
  • Angostura bitters (or try lemon juice)
  • Champagne
  • Brandy


METHOD:
First of all let me explain this one, I maybe didn't have any Angostura bitters. I decided to leave it out completely but I must admit that the cocktail does need something else so I would suggest trying some lemon juice instead if you don't have any bitters around - slightly different taste but will give the drink that kick that it needs.


  1. Place a sugar cube in each glass (or about 1/2 teaspoon of granulated sugar).
  2. Over the top of the sugar place a few drops of lemon juice or Angostura bitters.
  3. Over this place about 2 tablespoons of brandy
  4. Then for the grand finally - pour champagne over the top and watch the bubbles continually fizz from the sugar!


So here is to a great week and hopefully many more to come!
xx

Monday 28 January 2013

Before and After: Storage Box

I have a very great before and after for you today.


I acquired this 1950s storage box with its original cover. The cover has a pretty stripped, spotted and pink flower pattern and is made of a plastic material. The only problem I had was that the fabric had split where it had become brittle and started to deteriorate. I felt it was a shame to remove the original fabric so started on a mission to save it.

I began by removing the edging and original material from the top. I then lined the under side of the original material with a thin fabric. I adhered them together using a spray mount. I then stapled the material back on, but actually swapped the material round so that the largest of the splits was at the back. The edging was re-attached and the box was finished!


As you can see there is only a subtle difference between the two images. By supporting the material from underneath, the idea was to save the original fabric, and this method can often be hugely successful. Unfortunately, after taking the item to several markets and listening to customers feedback, I decided that entirely recovering the original fabric was the only way forward. Although I had managed to support the cracks the fabric was still very yellowed and fragile.

But do not fear, I found some fantastic vintage material which I couldn't resist, and with my Mum's new upholstery skills the box now looks stunning.


By saving the original binding around the edges, it breaks up the busy pattern and using some extra padding gives the box a great feel. I think this is a real winner and it would seem others agree with me, on its first time out to market, it sold!
xx

Friday 25 January 2013

New Item Friday

It was my birthday yesterday, and as my new hubby put it, I am the wrong side of 25 but the right side of 30. We spent the day at the thermal spa and then had dinner at Jamie Oliver's Restaurant in Bath. I had such a lovely day, but it was back to work as normal today and lots of items added to the shop.


I have my first market of the year in Bristol Ashton Gate on Sunday. It will feel strange getting back into the swing after having so much time off due to Christmas and the wedding, but I have so many plans for over this next year that I can not wait to get started. I know most people find January a bit hard but it will be pay day soon and I have a special treat coming up in February which I hope you will all enjoy - watch this space!

Have a good weekend.
xx

Wednesday 23 January 2013

Mid-Century Modern Freak

Oh my, I have fallen in love with a website - Mid-Century Modern Freak

You have to check out their archive. I love the way it is laid out with all the images visible in one go.


There is just so much inspiration I think I may have mid-century over-load. I think coffee cures that...
xx

Tuesday 22 January 2013

Tutorial: Painted Lampshade


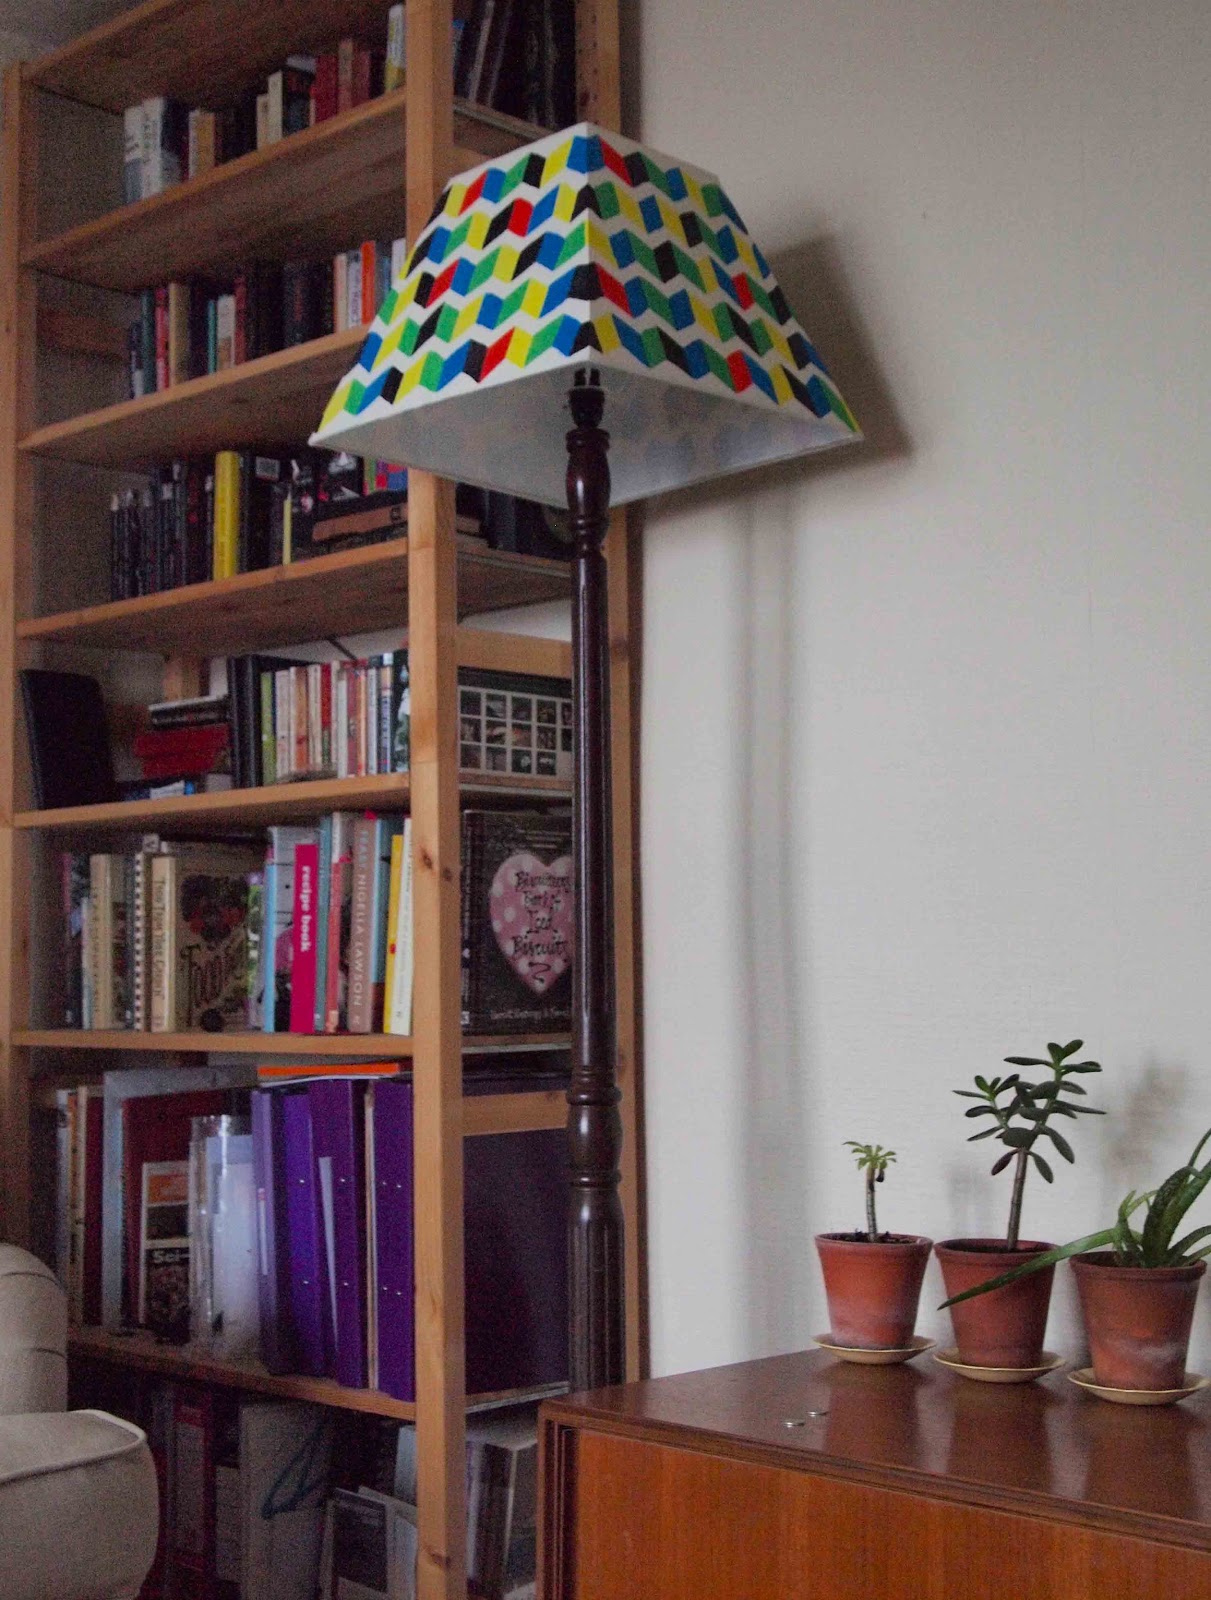
I have had this lampshade in my living room for a while and I am not entirely happy with it. I love the lamp stand but the shade is a left over from my Mum's house and if I'm honest I think the shade probably needs to be a different shape and size to go with stand. But until I find something more suitable I wanted to jazz this one up a bit as the cream colour is a little dull, and with all the snow outside I have no where else to go! I didn't really want to spend lots of money, as it is only a temporary fix, so I hunted around my supplies and found some acrylic paints.

Now, there are lots of arguments on the internet about painting lampshades, all to do with the shade heating up when the light is on. As far as I am aware acrylics are non-hazardous and should not emit any toxic gases as long as it is only exposed to ambient temperatures. Higher temperatures may melt acrylics (160 degrees Celsius and above) but if your light bulb emits this kind of heat I would suggest changing it anyway (that kind of temperature could bake a cake!). So basically acrylics are safe to use on lampshades but not with halogen light bulbs (halogen light bulbs tend to be hotter so might be best to avoid).

YOU WILL NEED:

  • Lampshade (mine was a textured fabric covered shade, plastic ones might not work but give it a go and see)
  • Paper
  • Scissors
  • Masking tape
  • Pens
  • A light (for example a torch)
  • Acrylic paints
  • Paint brushes
  • Pot of water


METHOD:
1. Remove your lampshade and line the interior with paper. Using masking tape, tape the sections of paper together.


2. Remove the paper from the interior of the lampshade. Cut the paper down one side so that you can lay it flat - remember which side was in contact with the interior of the shade as this is the side you will draw your design on to.


3. Next you need to prime the surface of the lampshade. I just used a basic white acrylic paint and did a couple of coats. If your lampshade is causing problems rolling around then you can always fix it back on to the stand to keep it still.


4. Whilst you let the primer dry get creating your design. I chose a simple chevron pattern and decided to pick out colours that were already in my room - green, blue, black, yellow and red. When drawing your pattern it is best to use a nice thick dark pen - you will see why later.


5. Next, place the paper with your design on back inside the lampshade. Fix in place using masking tape.
6. Now, for this part you can either place your lampshade back on the stand or grab yourself a torch of some kind. Use the light from the stand or the light from the torch to illuminate the pattern through the shade. This trick is very useful as it means you don't have to draw directly onto the lampshade and have pencil marks visible under your painting.


7. Then get painting. I slowly built up the different colours until the entire sides were full.


Once the painting is dry you can pop it back on your lampshade and use it as it is. But if you want to give your shade a nice finish you can always find a varnish to seal the surface - remember to make sure it is a varnish that will not react to heat and will not dissolve your paint (a spray adhesive would be an ideal solution but nothing water based). I left my shade as it was, after all it is just a temporary fix, and I like the matt look without any varnish added.


It even looks nice lite up and adds a bit more pop of colour into the room. A boring lampshade no more!
xx

Monday 21 January 2013

2013 Goals

Over the Christmas period I have been doing an e-course on successfully building and running your own Dream Job in creative industries, courtesy of Red Velvet. I'm sure I have mentioned Red Velvet before, but for any that don't know, it is a small but successful vintage boutique, sweet shoppe and clothing label based in the US.

One of the pieces of advice they give in their e-course is to set yourself goals each year to give your self something to aim for, and incorporate the goals into your calender. I wanted to set myself some ambitious goals for the business and some personal goals as well, as we have to remember all work and no play makes me very dull. Over the last few weeks I have been having a good think about what these goals should be and I thought I would share them with you.


Of course setting yourself goals is no fun unless you have some kind of reward system - for the smaller more achievable goals I'm thinking a new book and for the bigger harder goals I buy myself a lovely new item of clothing. I really recommend setting some goals of your own as it can help keep you focused throughout the year. Some of my goals are a bit silly but I think it is important to have some silly thrown in as well.

Right, I had better get to work!
xx

Friday 18 January 2013

New Item Friday

I am writing this very late whilst watching an episode of Doctor Who (I am mainly watching it for David Tennent but we don't tell the other half that!). Today was meant to be a productive day taking photos of items and posting them on etsy, but then it snowed!

So instead of having a productive morning I snuggled up watching the snow and drinking coffee. And then spent the afternoon walking around in the snow whilst trying to avoid my other half throwing snow at me.

But the guilt finally took over and I have spent my evening adding items, and a lovely selection I have for you.


Luckily I don't have any markets or plans for this weekend. I'm thinking more coffee and snow adventures are in order - would people laugh if they saw a 26 year old women on a baking tray (I don't have a sledge) sliding down the slopes with all the kids?
xx

Thursday 17 January 2013

Poppytalk

A new year and a new blog for you guys to follow. Poppytalk. With a great mix of interior design and crafty projects this blog has a great look and style to it.


All Images sourced from www.poppytalk.blogspot.co.uk

I might have to try out some of those projects for myself, and for anyone getting married the wedding posts are a great source of inspiration.
Enjoy.
xx

Tuesday 15 January 2013

Foot Stools

I felt a little bit guilty yesterday about teasing you with my new gorgeous footstool. To compensate I have found some fab ones currently for sale. With winter looking set to stay for a while a comfy chair, blanket, cup of tea, good book and sturdy foot stool is a must.


1 . 2 . 3 . 4 . 5 . 6

xx


Monday 14 January 2013

Put Up Your Feet!

So I am officially back up and running after Christmas holidays and Wedding extravaganza. It feels very weird not to have a side project whirling away in the back of my mind! My brain finally feels it has the space to do some stretching and slouching around (I realise that is a bit of a grouse visual but I assure you it is very happy in there).

The extra room has given me the opportunity to have a think about the business, plan my future goals and make some big realisations. 
  1. The business has done really well this year. I have broken even and that is a great thing for my first year. I should feel proud and celebrate!
  2. I need to push the business further. This means more markets, more advertising, and thinking of innovative ways to grow. Brainstorming time!
  3. I need to get all the online stuff working in sync. Currently they are all separate and they need to be combined. I think my IT man (the new hubby) will be given that job!
  4. I could not of got this far without my Mum! It sounds terrible to admit that I need my Mum but she has been such a positive influence, offered me support and been a great sounding board for ideas. Buy Mum some flowers!
  5. I have also realised that I can not do it all on my own. I need the support network I have around me, and when I feel stressed out, I need to remember I can ask people for help, it does not make me a failure if I do.

The last point is a real eye opener for me! Generally, I am a 'if you want the job done, do it yourself' kind of person. To admit to myself that I need other peoples help is a big deal for me. I could not do this business without my other half keeping me fed and housed, my Dad being there for advice and my Mum being fantastic. One area that she has taken a lead is upholstery. My Mum has started an upholstery course, mainly for her own enjoyment, but also to help me with the business and one of the first things she has completed is this....


This footstool has been recovered by my Mum using vintage fabric we bought at a market. I got it home and placed it with my 1960s arm chair and the two have been inseparable ever since! 


I think it is appropriate that one of her first projects is kept in the family, I know that two seconds at any market and it would be snapped up! I think I owe myself a present for a very succesful year!

Thank you Mum for everything and here's to another great year!
xx

Friday 4 January 2013

Wedding Mood Board: 1940s Shooting Party

I'm afraid there is no New Item this week as next week I am getting married! (and have been completely distracted with last minute arrangements.

I have planned the who thing myself and it is a rather quirky non-traditional wedding. I am extremely scared and worried that I have forgotten something important. We have 3 different venues - our ceremony in a beautiful town hall with a jazz music drinks reception, a high tea at our favourite intimate tea-rooms and live folk music and pie & mash at a fantastic country pub. It was basically all the things we love fitted into one day! Organising 3 venues has been tricky but more complicated is the shepherding of 80 people from one place to the other (even though they are all only 2 minutes walk from each other on the same High Street)! I thought I would share my wedding mood-board with you which has helped keep me focused on our vision.


When I first started planning my wedding I found a website called Snippet and Ink. It is a US site which gives fantastic mood-boards and inspiration for different wedding themes. I got very inspired! And I couldn't resist creating one of my own when we finally decided on our theme for the day. I say 'theme' but really a mood-board is to held focus the way you want your day to feel and look. We wanted a vintage traditional English shooting party feel with a few library themed element in the stationary. Brown and green are our main colours. The stag and pheasant are a running theme throughout the entire day and there will be lot of tweed!

I am keeping my fingers crossed everything goes ok! I will be silent the begining of next week but will share the results very soon.

Wish me luck!
xx

Thursday 3 January 2013

Treat Yourself to a Magazine Subscription!

January can be a very dull month....

I actually never find it dull as I got together with my other half in January so have our anniversary and my birthday is at the end of it. Plus, this year I am getting married in January!

...but I understand for the rest of you money tends to get a bit tight and there is not a huge amount to look forward to. My suggestion is, if you happen to have a little money left over from all the festivities, why not treat yourself to a magazine subscriptions. It means every month you get a little treat through the door, giving you a great opportunity to spend a little 'me' time reading with a cup of coffee.

Here are a few that have caught my eye.


Clockwise from Top Left:
1 . 2 . 3 . 4 . 5 . 6

xx