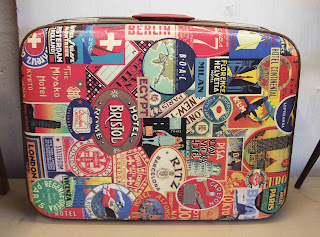
I haven't done a tutorial for a while, this one is very similar to a blog I have written previously - HERE - but I wanted to show you the step by step process of covering a suitcase. You can get such good results using wrapping paper, and its perfect for the interior and exterior.
I have had this suitcase for a while. It has come with me to many markets, but it just won't sell. I have always thought it looked a little worn on the outside but the inside had its great original dog tooth patterned paper lining, which I just wouldn't want to alter. When I was shopping the other day I found some really great wrapping paper, and I decided that it would be the perfect match for my suitcase. So here's the how to:
YOU WILL NEED:
- suitcase
- paper
- decoupage glue (that can be used to adhere paper to any kind of surface)
- scissors
- scalpel
- brush
- bull dog clips
- damp cloth
- Paper
- Masking tape
- Spray paint suitable for plastic surfaces
METHOD:
1. Make sure the surface of your suitcase is nice and clean. I have decided to just decorate the front and back only and leave the sides their natural brown.
2. I used one large sheet of wrapping paper for this, which does make it more difficult. If you want to use lots of little pieces you can just use the glue and paste the paper on the surface, gradually filling the area until you are done, then go straight to step 7.
4. To make life a bit easier for yourself I would suggest not sticking right along the edge but just on the flat surface. This will be explained later.
5. Continue to paste and stick the paper on the flat surface, trying to keep the paper nice and flat with no air bubbles. Once the whole flat surface is stuck, crease the paper around the edge and use a scalpel to create a nice neat edge. I like to do this bit before I apply the glue as the glue softens the paper, causing the paper to tear when you cut.
6. You can then stick the edges down. You might want to create small creases in the corners before you glue, but the main thing is to make sure you apply plenty of glue. Don't worry if the glue oozes on to the rest of the suitcase, simply wipe this off with a damp cloth before it dries.
7. The last stage is to cover the whole area in a layer of the glue. You might want to add more than one layer to ensure it is all sealed in properly.
8. One final touch which will really finish off any suitcase with a plastic handle - colour co-ordinate your handle with the wrapping paper. Simply mask off around the handle using tape, and cover the suitcase with paper to protect it. I sanded down the plastic surface lightly so that the paint would adhere fully. Then using the spray paint spray the handle, applying thin layers, slowly building them up. Once dry remove the paper and tape.
And you are left with a very funky suitcase. Hopefully this will inspire you next time you are looking for wrapping paper for presents - use the rest of the role to liven up some of your possessions.
xx


No comments:
Post a Comment